Select Insert, Update And Delete With ASP.NET MVC

Introduction

In this article we will learn how to perform CRUD operations in an ASP.Net MVC application.

Whenever we are developing the applications we are related to a database and in the database driven applications we need to perform CRUD operations. On various blogs and sites you will find CRUD operation samples about ASP.Net MVC. But on many the sites I have seen they are all using Entity Framework to perform the CRUD. Since it is the standard, we have to follow it while developing ASP.Net MVC applications instead of using DataSet, Command, Connection, DataAdapter and DataReader. But in many cases we have to use these ADO.Net 2.0 operations. In this  article we will perform all the operations using ADO.NET instead of the ADO.NET Entity Framework. But use these ADO.Net only where you need to else use the ADO.Net Entity Framework only. So let’s start performing CRUD using ADO.Net.

Step 1 : Create the table in your database with the following script.

Create Table Authors

(

AuthorId int Identity(1,1)Primary Key,

Fname Varchar(50),

Lname Varchar(50)

)

Step 2 : Now create a new ASP.Net MVC3 Web application with an empty template. This will create one predefined structure with Controllers, Modes and Views folders. All these folders are empty; now we have to add the content to these folders.

Step 3 : As you know, first we have to create a controller so let’s add a new controller with the name Home in the controllers folder. Now our empty controller is ready with an Index method. On the index method we will call the dataset from the database to display the existing Authors in our table. For this we will create a model which will return the dataset, then we will display this data on the view through the Index method of the Home controller. So let’s create one model i.e. class in Models folder with the name SelectModel and write the following code in it to retrieve the data from the database.

public DataSet GetAllAuthors()
{
SqlConnection cn = new SqlConnection(@”Data Source=NARESHIT-PC\DOTNET116;User Id=sa;Password=123;DataBase=DEMODB.MDF”);
SqlCommand cmd=new SqlCommand(“Select AuthorId,Fname,Lname From Authors”,cn);
DataSet ds=new DataSet();
SqlDataAdapter da=new SqlDataAdapter(cmd);
da.Fill(ds);
return ds;
}

In the selectModel class we have one method called GetAllAuthors which returns the dataset of all authors. Now modify your Index method of Home Controller like Entity Framework.

public ActionResult Index(SelectInsertUpdateDelete.Models.SelectModel selectmodel)
{
DataSet ds = selectmodel.GetAllAuthors();
ViewBag.AuthorList = ds.Tables[0];
return View();
}

In the above line of code we called the GetAllAuthors method from SelectModel which will return the dataset object and simply we put this dataset in the viewbag. As you know in C# 4.0 we have dynamic programming; you can see one excellent example with viewbag. Here we have written ViewBag.AuthorList which will create dynamically on Author list on runtime for us. Still now we are finished up to calling the dataset and transferring it to the view but still we don’t have any
view so right-click in the Index method and add a new empty view to display our authorlist and write the following markup to display the results.

<table>

<tr>

<td style=”background-color: #800080; color: #FFFFFF; font-family: ‘Times New Roman’, Times, serif;

font-size: large; border-style: inset; border-width: thin”>

Fname:

</td>

<td style=”background-color: #800080; color: #FFFFFF; font-family: ‘Times New Roman’, Times, serif;

font-size: large; border-style: inset; border-width: thin”>

Lname:

</td>

</tr>

<%foreach (System.Data.DataRow dr in ViewBag.AuthorList.Rows)

{%>

<tr>

<td>

<%= Html.ActionLink(“Edit”, “Edit”, new { id = dr[“AuthorId”].ToString() })%>

<%= Html.ActionLink(“Delete”, “Delete”, new { id = dr[“AuthorId”].ToString() })%>

</td>

<td>

<%=dr[“Fname”].ToString()%>

</td>

<td>

<%=dr[“Lname”].ToString() %>

</td>

</tr>

<%}%>

</table>

<%= Html.ActionLink(“Add New Author”, “Add”) %>

In the above markup we are displaying our authorlist by creating a HTML table with having Edit and Delete links and lastly having one more ActionLink to add a new author record.

Step 4 : At this stage we are ready with our Index or select operation; now we can add more methods to our Home Controller to perform Edit, Update and Delete operation so let’s start with adding a new record i.e. inserting a new record in the database. In the last step we added an Add New Author ActionLink with Add method so we need to add two more methods in our Home Controller, one for displaying the fields and another for inserting the values; but before that we need to create our model. So add one Model class called InsertModel in your models folder and write the code like below.

[Required]
[Display(Name=”First Name:”)]
public string Fname { get; set; }
[Required]
[Display(Name=”Last Name:”)]
public string Lname { get; set; }
public int Insert(string _fname, string _lname)
{
SqlConnection cn = new SqlConnection(@”Data Source=NARESHIT-PC\DOTNET116;User Id=sa;Password=123;DataBase=DEMODB.MDF”);
SqlCommand cmd = new SqlCommand(“Insert Into Authors(Fname,Lname)Values(‘”+_fname+”‘,'”+_lname+”‘)”, cn);
cn.Open();
return cmd.ExecuteNonQuery();
}

The Above code contains some properties with attributes that are used for validation on our view as well as the InsertModel contains Insert method for inserting values in database. Now our InsertModel is ready, so you can add two methods for adding the record in the database add one ADD method with [HttpGet] and a second ADD method with [HttpPost] attributes. These attributes are all of you known. So create two add methods like below.

[HttpGet]
public ActionResult Add()
{
return View();
}
[HttpPost]
public ActionResult Add(SelectInsertUpdateDelete.Models.InsertModel insertmodel)
{
if (ModelState.IsValid)
{
int _records = insertmodel.Insert(insertmodel.Fname, insertmodel.Lname);
if (_records>0)
{
return RedirectToAction(“Index”, “Home”);
}
else
{
ModelState.AddModelError(“”, “Can Not Insert”);
}
}
return View(insertmodel);
}

In the above code, first one add method simply returns the view to take some input from the user and the second add method gets the values from the view and validates it and inserts these values into the database by calling the Insert method of InserModel.

Step 5 : Still now we have only finished Select and Insert operations; now we will see Edit and update. In step3 we have added one edit link bind with AuthorId. On the basis of this AuthorId we will Edit the record and update the record in the database. As in previous steps we need one more Model class so add a Model class called UpdateModel and write the code like below.

public int AuthorId { get; set; }
[Required]
[Display(Name = “First Name:”)]
public string Fname { get; set; }
[Required]
[Display(Name = “Last Name:”)]
public string Lname { get; set; }
public int Update(string _fname, string _lname,int _authorid)
{
SqlConnection cn = new SqlConnection(@”Data Source=NARESHIT-PC\DOTNET116;User Id=sa;Password=123;DataBase=DEMODB.MDF”);
SqlCommand cmd = new SqlCommand(“Update Authors Set Fname='”+_fname+”‘,Lname='”+_lname+”‘ Where AuthorId=”+_authorid, cn);
cn.Open();
return cmd.ExecuteNonQuery();
}

In the above code we have properties and one Update method to update the record in the database. In all ModelClasses you can see I’m using ADO.Net only.
Now we have our model class ready so we can add some methods to perform Edit and update operations in our Home Controller so add two more methods called Edit for editing and updating the records like below.

[HttpGet]
public ActionResult Edit( int id,SelectInsertUpdateDelete.Models.UpdateModel updatemodel)
{
SqlConnection cn = new SqlConnection(@”Data Source=NARESHIT-PC\DOTNET116;User Id=sa;Password=123;DataBase=DEMODB.MDF”);
SqlCommand cmd = new SqlCommand(“Select AuthorId,Fname,Lname From Authors Where AuthorId=” + id, cn);
cn.Open();
SqlDataReader dr = cmd.ExecuteReader();
if (dr.Read())
{
updatemodel.AuthorId = Convert.ToInt32(dr[“AuthorId”].ToString());
updatemodel.Fname = dr[“Fname”].ToString();
updatemodel.Lname = dr[“Lname”].ToString();
}
else
{
dr.Close();
}
dr.Close();
cn.Close();
return View(updatemodel);
}
[HttpPost]
public ActionResult Edit(SelectInsertUpdateDelete.Models.UpdateModelupdatemodel,FormCollection form,int id)
{
if (ModelState.IsValid)
{
int _records = updatemodel.Update(updatemodel.Fname, updatemodel.Lname,id);
if (_records > 0)
{
return RedirectToAction(“Index”, “Home”);
}
{
ModelState.AddModelError(“”, “Can Not Update”);
}
}
return View(updatemodel);
}

In the above code you can see first the edit method performs some logic to call the specified id record from the database and display this record on the view and the second Edit method performs the update operations.

Step 6 : Now our last operation still remains, i.e. delete; so to delete, add one more model called DeleteModel and write the following code which contains only a delete method to delete the record of the specified AuthorId from the database.

public int Delete(int id)
{
SqlConnection cn = new SqlConnection(@”Data Source=NARESHIT-PC\DOTNET116;User Id=sa;Password=123;DataBase=DEMODB.MDF”);
SqlCommand cmd = new SqlCommand(“Delete From Authors Where AuthorId=”+id, cn);
cn.Open();
return cmd.ExecuteNonQuery();
}

In Step3 we have added one ActionLink with delete and given the authorid to it for deleting the specified authorid record from the database. So now we can add one Delete Method in our Home Controller, so add it and write the following code to call the delete method of the DeleteModel to delete the record.

[HttpGet]
public ActionResult Delete(int id,SelectInsertUpdateDelete.Models.DeleteModel deletemodel)
{
int records = deletemodel.Delete(id);
if (records>0)
{
return RedirectToAction(“Index”, “Home”);
}
else
{
ModelState.AddModelError(“”, “Can Not Delete”);
return View(“Index”);
}
}

Now we have completed all our operations. Now you can run the application and can perform all the Select, Insert, Update and Delete operations.

Conclusion: In this article we have seen how to add, edit, update and delete the records using ADO.NET in ASP.Net MVC. I hope you enjoyed this article.

Creating Insert Update and Delete Application In MVC 4 Using Razor

Creating an insert, update and delete application in MVC 4 using Razor syntax. I am providing a small demo application.

Server Part

Starting with creating the table: tbInsertMobile.

Creating Table

Create table tbInsertMobile

(

MobileID Bigint not null primary key IDENTITY(1,1),

MobileName Nvarchar(100),

MobileIMEno Nvarchar(50),

mobileprice numeric(19,2),

mobileManufacured Nvarchar(100),

CreatedDate datetime default Getdate()

)

Creating Stored Procedures

Create proc Usp_InsertUpdateDelete

@MobileID Bigint =0 ,

@MobileName Nvarchar(100) = null,

@MobileIMEno Nvarchar(50) = null,

@mobileprice numeric(19,2) = 0,

@mobileManufacured Nvarchar(100) = null,

@Query int

as

begin

if(@Query = 1)

begin

Insert into  tbInsertMobile

(

MobileName ,

MobileIMEno ,

mobileprice,

mobileManufacured

)

values

(

@MobileName ,

@MobileIMEno ,

@mobileprice,

@mobileManufacured

)

if(@@ROWCOUNT > 0)

begin

select ‘Insert’

end

end

if(@Query = 2)

begin

update tbInsertMobile

set

MobileName =@MobileName ,

MobileIMEno =@MobileIMEno ,

mobileprice =@mobileprice,

mobileManufacured =@mobileManufacured

where tbInsertMobile.MobileID =@MobileID

select ‘Update’

end


if(@Query = 3)

begin

Delete from tbInsertMobile where tbInsertMobile.MobileID =@MobileID

select ‘Deleted’

end


if(@Query = 4)

begin

Select * from tbInsertMobile

end

End


if(@Query = 5)

begin

Select * from tbInsertMobile where tbInsertMobile.MobileID =@MobileID

end

Now for the code.

Begin by creating a MVC application as in the following:

After adding an application name the second screen will pop up prompting for a selection of a Project Template.

In this select Internet application and View Engine Razor and click OK.

Then your project is created successfully.

In this application I will first add a Model.

Provide the Model the name Mobiledata.cs.

After creating the model:


In the Model I will declare Properties and Validation (DataAnnotations).

Here are a number of DataAnnotations that we can use in a model.

The following are the Data Annotations we can use in a Model:

  1. DisplayName: Provides a general-purpose attribute that lets you specify localizable strings to display.
  2. Required: A value is required
  3. DataType: The data type annotation can be used to specify the data type for validation.
  4. StringLength: Max. length of an array or string data allowed.
  5. DisplayFormat: Specify the display format for a property like various formats for the Date property.
  6. ReqularExpression: Validate the value of a property by specifyng a regular expression pattern.
  7. Range: Numeric range constraints for the data field value.
  8. MaxLength: Specify max length for a string property.
  9. Bind: Specify fields to include or exclude when adding parameter or form values to model properties.
  10. Compare: The Compares property compares two properties
  11. Key: Denotes one or more properties that uniquely identify an entity.

In the Model I added Properties and Validation.

Model Code

using System.ComponentModel.DataAnnotations;


namespace MymobilewalaMvc.Models

{

public class Mobiledata

{

public int MobileID {get;set;}


[Required(ErrorMessage=”Please Enter Mobile Name”)]

[Display(Name=”Enter Mobile Name”)]

[StringLength(50, MinimumLength = 3, ErrorMessage = “Mobile Name must be between 3 and 50 characters!”)]

public string MobileName {get;set;}


[Required(ErrorMessage=”Please Enter MobileIMEno”)]

[Display (Name=”Enter MobileIMEno”)]

[MaxLength (100,ErrorMessage=”Exceeding Limit”)]

public string MobileIMEno {get;set;}


[Required(ErrorMessage = “Please Enter Mobile Price”)]

[Display (Name=”Enter Mobile Price”)]

[DataType(DataType.Currency)]

public string mobileprice {get;set;}


[Required(ErrorMessage = “Please Enter Mobile Manufacured”)]

[Display(Name = “Enter Mobile Manufacured”)]

[DataType(DataType.Text)]

public string mobileManufacured { get; set; }


}

}

We have completed creating the Model. Let’s start adding the controller.

Select Controller; a new Window will then pop up asking for the Controller name.

Provide the name MobilestoreController. (We should add “Controller” as a suffix of all Controllers.)

And click on the Add button to add it.

If you do not understand what a controller is then see my first tutorial.

Now we will add a folder and class for accessing a Database Connection and doing the inserting, updating and deleting.

The following shows the added folder name DataAccessLayer.

Right-click on the DataAccessLayer folder and select add class then provide the class the name DBdata.cs.

Namespace used.

using System;

using System.Collections.Generic;

using System.Linq;

using System.Web;

using System.Data;

using System.Data.SqlClient;

using System.Configuration;

using MymobilewalaMvc.Models;

The namespace MymobilewalaMvc.Models is used to access the model we created.

In the Model I have created the following 5 methods:

  1.  InsertData
  2. UpdateData
  3. DeleteData
  4. SelectAllData
  5. SelectAllDatabyID

InsertData

public string InsertData(Mobiledata MD)

{

SqlConnection con = null;

string result = “”;

try

{

con = new SqlConnection(ConfigurationManager.ConnectionStrings[“mycon”].ToString());

SqlCommand cmd = new SqlCommand(“Usp_InsertUpdateDelete”, con);

cmd.CommandType = CommandType.StoredProcedure;

cmd.Parameters.AddWithValue(“@MobileID”, 0);

// i will pass zero to MobileID beacause its Primary .

cmd.Parameters.AddWithValue(“@MobileName”, MD.MobileName);

cmd.Parameters.AddWithValue(“@MobileIMEno”, MD.MobileIMEno);

cmd.Parameters.AddWithValue(“@mobileprice”, MD.mobileprice);

cmd.Parameters.AddWithValue(“@mobileManufacured”, MD.mobileManufacured);

cmd.Parameters.AddWithValue(“@Query”, 1);

con.Open();

result = cmd.ExecuteScalar().ToString();

return result;

}

catch

{

return result = “”;

}

finally

{

con.Close();

}

}

Update Data

public string UpdateData(Mobiledata MD)

{

SqlConnection con = null;

string result = “”;

try

{

con = new SqlConnection(ConfigurationManager.ConnectionStrings[“mycon”].ToString());

SqlCommand cmd = new SqlCommand(“Usp_InsertUpdateDelete”, con);

cmd.CommandType = CommandType.StoredProcedure;

cmd.Parameters.AddWithValue(“@MobileID”, MD.MobileID);

cmd.Parameters.AddWithValue(“@MobileName”, MD.MobileName);

cmd.Parameters.AddWithValue(“@MobileIMEno”, MD.MobileIMEno);

cmd.Parameters.AddWithValue(“@mobileprice”, MD.mobileprice);

cmd.Parameters.AddWithValue(“@mobileManufacured”, MD.mobileManufacured);

cmd.Parameters.AddWithValue(“@Query”, 2);

con.Open();

result = cmd.ExecuteScalar().ToString();

return result;

}

catch

{

return result = “”;

}

finally

{

con.Close();

}

}

DeleteData

public string DeleteData(Mobiledata MD)

{

SqlConnection con = null;

string result = “”;

try

{

con = new SqlConnection(ConfigurationManager.ConnectionStrings[“mycon”].ToString());

SqlCommand cmd = new SqlCommand(“Usp_InsertUpdateDelete”, con);

cmd.CommandType = CommandType.StoredProcedure;

Cmd.Parameters.AddWithValue(“@MobileID”, MD.MobileID);

cmd.Parameters.AddWithValue(“@MobileName”, null);

cmd.Parameters.AddWithValue(“@MobileIMEno”, null);

cmd.Parameters.AddWithValue(“@mobileprice”, 0);

cmd.Parameters.AddWithValue(“@mobileManufacured”, null);

cmd.Parameters.AddWithValue(“@Query”, 3);

con.Open();

result = cmd.ExecuteScalar().ToString();

return result;

}

catch

{

return result = “”;

}

finally

{

con.Close();

}
}
SelectAllData

public DataSet SelectAllData()

{

SqlConnection con = null;

string result = “”;

DataSet ds = null;

try

{

con = new SqlConnection(ConfigurationManager.ConnectionStrings[“mycon”].ToString());

SqlCommand cmd = new SqlCommand(“Usp_InsertUpdateDelete”, con);

cmd.CommandType = CommandType.StoredProcedure;

cmd.Parameters.AddWithValue(“@MobileID”,0);

cmd.Parameters.AddWithValue(“@MobileName”, null);

cmd.Parameters.AddWithValue(“@MobileIMEno”, null);

cmd.Parameters.AddWithValue(“@mobileprice”, 0);

cmd.Parameters.AddWithValue(“@mobileManufacured”, null);

cmd.Parameters.AddWithValue(“@Query”, 4);

con.Open();

SqlDataAdapter da = new SqlDataAdapter();

da.SelectCommand = cmd;

ds = new DataSet();   da.Fill(ds);

return ds;

}

catch

{

return ds;

}

finally

{

con.Close();

}

}

SelectAllDatabyID

public DataSet SelectAllDatabyID(string MobileID)

{

SqlConnection con = null;

string result = “”;

DataSet ds = null;

try

{

con = new SqlConnection(ConfigurationManager.ConnectionStrings[“mycon”].ToString());

SqlCommand cmd = new SqlCommand(“Usp_InsertUpdateDelete”, con);

cmd.CommandType = CommandType.StoredProcedure;

cmd.Parameters.AddWithValue(“@MobileID”, MobileID); // i will pass zero to MobileID beacause its Primary .

cmd.Parameters.AddWithValue(“@MobileName”, null);

cmd.Parameters.AddWithValue(“@MobileIMEno”, null);

cmd.Parameters.AddWithValue(“@mobileprice”, 0);

cmd.Parameters.AddWithValue(“@mobileManufacured”, null);

cmd.Parameters.AddWithValue(“@Query”, 4);

con.Open();

SqlDataAdapter da = new SqlDataAdapter();

da.SelectCommand = cmd;

ds = new DataSet();

da.Fill(ds);

return ds;

}

catch

{

return ds;

}

finally

{

con.Close();

}

}

Ha ha, finally we have completed the Transcation Part.

Let’s return to the Controller we added.

Just Rebuild the application.

In the Controller add the following two methods:

public ActionResult InsertMobile() // Calling when we first hit controller.

{

return View();

}


[HttpPost]

public ActionResult InsertMobile(Mobiledata MB) // Calling on http post (on Submit)

{

return View();

}

Now I will add a View to the Controller.

Just right-click on Action result Insertmobile add select “Add View…”.

After selecting Add View we will get a New Window.

Just select (create a strongly-typed view).

Inside that select the Model Name we created and click Add.

After adding like this a View will be generated.

With extension .cshtml.

In the design we will use a HTMLHELPER Class.

To begin with form we use:

@using (Html.BeginForm())

{
}

For the Label, TextBox and validation message we use:
@Html.LabelFor(a => a.MobileName)

@Html.TextBoxFor(a => a.MobileName)

@Html.ValidationMessageFor(a => a.MobileName)

You will be thinking, what is “a”? It is a lamda expressiom.

The advantage of using a lamda expression is that you get compile-time checking of your properties. For example, if you rename ViewModel.Name to ViewModel.ClientName then all your Html.DisplayFor(x => model.Name) won’t compile, thus making sure you change them. If you don’t use lamda expressions then all your Html.Display() calls will work, but you will get hidden bugs with model binding that will not be immediately obvious of what’s wrong.

The following is the complete design of InsertMobile.

@model MymobilewalaMvc.Models.Mobiledata

@{

ViewBag.Title = “InsertMobile”;

}

<h2>

InsertMobile</h2>


<table>

<tr>

<td>

@Html.ActionLink(“Show All Mobile List”, “ShowAllMobileDetails”)

</td>

</tr>

</table>

@using (Html.BeginForm())

{

<table width=”100%”>

<tr>

<td>

@Html.LabelFor(a => a.MobileName)

</td>

</tr>

<tr>

<td>

@Html.TextBoxFor(a => a.MobileName)

@Html.ValidationMessageFor(a => a.MobileName)

</td>

</tr>

<tr>

<td>

@Html.LabelFor(a => a.MobileIMEno)

</td>

</tr>

<tr>

<td>

@Html.TextBoxFor(a => a.MobileIMEno)

@Html.ValidationMessageFor(a => a.MobileIMEno)

</td>

</tr>

<tr>

<td>

@Html.LabelFor(a => a.mobileManufacured)

</td>

</tr>

<tr>

<td>

@Html.TextBoxFor(a => a.mobileManufacured)

@Html.ValidationMessageFor(a => a.mobileManufacured)

</td>

</tr>

<tr>

<td>

@Html.LabelFor(a => a.mobileprice)

</td>

</tr>

<tr>

<td>

@Html.TextBoxFor(a => a.mobileprice)

@Html.ValidationMessageFor(a => a.mobileprice)

</td>

</tr>

<tr>

<td colspan=”2″>

<input id=”Submit1″ type=”submit” value=”submit” />

</td>

</tr>

</table>

}

Now just run your application and check output.

After Adding Insert code on [Httppost]:

[HttpPost]

public ActionResult InsertMobile(Mobiledata MB) // Calling on http post (on Submit)

{

if (ModelState.IsValid) //checking model is valid or not

{

DataAccessLayer.DBdata objDB = new DataAccessLayer.DBdata(); //calling class DBdata

string result = objDB.InsertData(MB); // passing Value to DBClass from model

ViewData[“result”] = result;

ModelState.Clear(); //clearing model

return View();

}

else

{

ModelState.AddModelError(“”, “Error in saving data”);

return View();

}

}

On cs.html

Added this to display message after saving data.

@{

if (ViewData[“result”] != “” && ViewData[“result”] != null)

{

ViewData[“result”] = null;

alert(“Data saved Successfully”);

}

}

Run the application and insert records into it.

Now we have completed the Insert part.

Next we will create a basic grid view for displaying records.

For that we will add a new View but using the same Controller.

Let’s begin with adding a View. A strongly typed View.

public ActionResult ShowAllMobileDetails(Mobiledata MB)
{
return View();
}

After creating Action Result just right-click on ActionResult and select Add View.

And also check:

  1. Create a strongly-typed view option
  2. Use a layout or master page

Select the same Model as we used when creating InsertMobile.

Just click on the Add button.

A new View has been created.

After this in the Model I am adding new Properties as in the following:

public DataSet StoreAllData { get; set; }

For storing values in a dataset and displaying values from a dataset on the View.

Because in MVC you can access a complete Model in a View.

In ActionResult I will access DBdata and get the dataset and pass it to a model dataset name.

(StoreAlldata)

public ActionResult ShowAllMobileDetails(Mobiledata MB)

{

DataAccessLayer.DBdata objDB = new DataAccessLayer.DBdata(); //calling class DBdata

MB.StoreAllData = objDB.SelectAllData();

return View(MB);

}

After this on the view I will display data from the dataset using a for loop.

And also adding the 2 linkbuttons Edit and Delete.

@Html.ActionLink(“EDIT”, “EDITMOBILEDATA”, new { id = Model.StoreAllData.Tables[0].Rows[i][“MobileID”].ToString() })

@Html.ActionLink(“Delete”, “DELETEMOBILEDATA”, new { id = Model.StoreAllData.Tables[0].Rows[i][“MobileID”].ToString() })

Example

EDIT name of Button.

EDITMOBILEDATA is the name of the page; on a click it will redirect with id.

@model MymobilewalaMvc.Models.Mobiledata

@{

ViewBag.Title = “ShowAllMobileDetails”;

}

<h2>

ShowAllMobileDetails</h2>

<table>

<tr>

<td>

@Html.ActionLink(“Add New Mobiles”, “InsertMobile”)

</td>

</tr>

</table>

@{

for (int i = 0; i < Model.StoreAllData.Tables[0].Rows.Count; i++)

{

var MobileID = Model.StoreAllData.Tables[0].Rows[i][“MobileID”].ToString();

var MobileName = Model.StoreAllData.Tables[0].Rows[i][“MobileName”].ToString();

var MobileIMEno = Model.StoreAllData.Tables[0].Rows[i][“MobileIMEno”].ToString();

var Mobileprice = Model.StoreAllData.Tables[0].Rows[i][“mobileprice”].ToString();

var MobileManufacured = Model.StoreAllData.Tables[0].Rows[i][“mobileManufacured”].ToString();

<table width=”100%”>

<tr>

<td>

MobileID

</td>

<td>

MobileName

</td>

<td>

Mobile IMEI No

</td>

<td>

Mobileprice

</td>

<td>

Mobile Manufactured

</td>

<td>

EDIT

</td>

<td>

DELETE

</td>

</tr>

<tr>

<td>

@MobileID

</td>

<td>

@MobileName

</td>

<td>

@MobileIMEno

</td>

<td>

@Mobileprice

</td>

<td>

@MobileManufacured

</td>

<td>

@Html.ActionLink(“EDIT”, “EDITMOBILEDATA”, new { id = Model.StoreAllData.Tables[0].Rows[i][“MobileID”].ToString() })

</td>

<td>

@Html.ActionLink(“Delete”, “DELETEMOBILEDATA”, new { id = Model.StoreAllData.Tables[0].Rows[i][“MobileID”].ToString() })

</td>

</tr>

<tr>

<td>

@Html.ActionLink(“Add New Mobiles”, “InsertMobile”)

</td>

</tr>

</table>

}

}

View of ShowAllMobileDetails:


Let’s now add two new Views to the same controller.

1. EDITMOBILEDATA

In this ActionResult I have provided a string id to the method to receive an ID when I click on the Edit button.

After getting the ID, get data from the database depending on that id and display record.

public ActionResult EDITMOBILEDATA(string id)

{

DataAccessLayer.DBdata objDB = new DataAccessLayer.DBdata(); //calling class DBdata

DataSet ds = objDB.SelectAllDatabyID(id);

Mobiledata MB = new Mobiledata();

MB.MobileID = Convert.ToInt32(ds.Tables[0].Rows[0][“MobileID”].ToString());

MB.MobileName = ds.Tables[0].Rows[0][“MobileName”].ToString();

MB.MobileIMEno = ds.Tables[0].Rows[0][“MobileIMEno”].ToString();

MB.mobileprice = ds.Tables[0].Rows[0][“mobileprice”].ToString();

MB.mobileManufacured = ds.Tables[0].Rows[0][“mobileManufacured”].ToString();

return View(MB);

}

Just right-click on ActionResult and add a View of a strong type.

After adding the view I will design the View to edit and update data.

@model MymobilewalaMvc.Models.Mobiledata

@{

ViewBag.Title = “EDITMOBILEDATA”;

}

<h2>

EDITMOBILEDATA</h2>

<table>

<tr>

<td>

@Html.ActionLink(“Show All Mobile List”, “ShowAllMobileDetails”)

</td>

</tr>

</table>

<br />

@using (Html.BeginForm())

{

<table width=”100%”>

<tr>

<td colspan=”2″>

@Html.HiddenFor(a => a.MobileID)

</td>

</tr>

<tr>

<td>

@Html.LabelFor(a => a.MobileName)

</td>

</tr>

<tr>

<td>

@Html.TextBoxFor(a => a.MobileName)

@Html.ValidationMessageFor(a => a.MobileName)

</td>

</tr>

<tr>

<td>

@Html.LabelFor(a => a.MobileIMEno)

</td>

</tr>

<tr>

<td>

@Html.TextBoxFor(a => a.MobileIMEno)

@Html.ValidationMessageFor(a => a.MobileIMEno)

</td>

</tr>

<tr>

<td>

@Html.LabelFor(a => a.mobileManufacured)

</td>

</tr>

<tr>

<td>

@Html.TextBoxFor(a => a.mobileManufacured)

@Html.ValidationMessageFor(a => a.mobileManufacured)

</td>

</tr>

<tr>

<td>

@Html.LabelFor(a => a.mobileprice)

</td>

</tr>

<tr>

<td>

@Html.TextBoxFor(a => a.mobileprice)

@Html.ValidationMessageFor(a => a.mobileprice)

</td>

</tr>

<tr>

<td colspan=”2″>

<input id=”Submit1″ type=”submit” value=”Update” />

</td>

</tr>

</table>

}

@{

if (ViewData[“resultUpdate”] != “” && ViewData[“resultUpdate”] != null)

{

ViewData[“resultUpdate”] = null;

alert(“Data Updated Successfully”);

}

}

After clicking on the Edit Button from ShowAllmobileDetails.

Creating the same ActionResult of EDITMOBILEDATA with a model as a parameter for postdata.

[HttpPost]

public ActionResult EDITMOBILEDATA(Mobiledata MD)

{

DataAccessLayer.DBdata objDB = new DataAccessLayer.DBdata(); //calling class DBdata

string result = objDB.UpdateData(MD); // passing Value to DBClass from model

ViewData[“resultUpdate”] = result; // for dislaying message after updating data.

return RedirectToAction(“ShowAllMobileDetails”, “Mobilestore”);

}

This will post data when the user will click the Update Button.

Adding the last View to delete records.

2. DELETEMOBILEDATA

In this ActionResult I have given a string id to the method to receive an ID when I click on the Delete button.

1. After getting an ID get data from the database and depending on that id display complete records and then it is possible to delete records.

public ActionResult DELETEMOBILEDATA(string id)

{

DataAccessLayer.DBdata objDB = new DataAccessLayer.DBdata(); //calling class DBdata

DataSet ds = objDB.SelectAllDatabyID(id);

Mobiledata MB = new Mobiledata();

MB.MobileID = Convert.ToInt32(ds.Tables[0].Rows[0][“MobileID”].ToString());

MB.MobileName = ds.Tables[0].Rows[0][“MobileName”].ToString();

MB.MobileIMEno = ds.Tables[0].Rows[0][“MobileIMEno”].ToString();

MB.mobileprice = ds.Tables[0].Rows[0][“mobileprice”].ToString();

MB.mobileManufacured = ds.Tables[0].Rows[0][“mobileManufacured”].ToString();

return View(MB);

}

Right-click on Actionresult then select Add View.

After adding a Design View to show records when deleting.

@model MymobilewalaMvc.Models.Mobiledata

@{

ViewBag.Title = “DELETEMOBILEDATA”;

}

<h2>

DELETEMOBILEDATA</h2>

<table>

<tr>

<td>

@Html.ActionLink(“Add New Mobiles”, “InsertMobile”)

</td>

<td>

@Html.ActionLink(“Show All Mobile List”, “ShowAllMobileDetails”)

</td>

</tr>

</table>

<br />

@using (Html.BeginForm())

{

<table width=”100%”>

<tr>

<td colspan=”2″>

@Html.HiddenFor(a => a.MobileID)

</td>

</tr>

<tr>

<td>

MobileName :-

@Html.DisplayFor(a => a.MobileName)

</td>

</tr>

<tr>

<td>

MobileIMEI Number:-

@Html.DisplayFor(a => a.MobileIMEno)

</td>

</tr>

<tr>

<td>

Mobile Manufacured :-

@Html.DisplayFor(a => a.mobileManufacured)

</td>

</tr>

<tr>

<td>

Mobileprice :-

@Html.DisplayFor(a => a.mobileprice)

</td>

</tr>

<tr>

<td colspan=”2″>

<input id=”Submit1″ onclick=”return confirm(‘Are you sure you want delete’);” type=”submit”

value=”Delete” />

</td>

</tr>

</table>

}

Creating the same ActionResult of DELETEMOBILEDATA with a model as a parameter for postdata.

[HttpPost]

public ActionResult DELETEMOBILEDATA(Mobiledata MD)

{

DataAccessLayer.DBdata objDB = new DataAccessLayer.DBdata(); //calling class DBdata

string result = objDB.DeleteData(MD);

return RedirectToAction(“ShowAllMobileDetails”, “Mobilestore”);

}

This will post data when the user clicks the Delete Button.

Finally we are completed with insert, update, and delete in MVC.

Creating an ASP.NET MVC Application

Background

There are many ways to insert data into a database using ASP.NET MVC, but in this example we use a simple technique to insert data into a database using ASP.NET MVC. I have written this article focusing on beginners so they can understand the basics of MVC. Please read my previous article using the following link:

Step 1

Now let us start with a step-by-step approach from the creation of simple MVC application as in the following:

  1. “Start” -> “All Programs” -> “Microsoft Visual Studio 2010”.
  2. “File” -> “New” -> “Project…” then select “C#” -> “ASP.NET MVC 4 Application” then choose internet application.
  3. Provide the website a name as you wish and specify the location.
  4. Now after adding the MVC project, the Solution Explorer will look like the following:

After creating the ASP.NET MVC project, the preceding folder structure and files are added into the project by default, so let us learn about them in brief as in the following:
  • App_Start folder
          This folder contains the application configuration details such as routing, authentication, filtering of URL and so on.
  • Controller 
          This folder contains the controller and their methods. The controller is responsible for processing the user request and return output as a view.
  •  Models
This folder contains the entities or properties used to store the input values.
  • View
This folder contains the UI pages including shared page, .CSHTMl, .VBHTML, HTML,aspx pages that show the output to the end user.
I hope you have understood folder structure in brief.

Step 2

 
Now let us delete all the existing views, models and controller folder files. We will create it again step-by-step so that it is easier for us to understand. After deleting the existing files the Solution Explorer will look as in the following:


Step 3
Now to create the Model.
 
Add the new class by right-clicking on the Model folder and provide the name as EmpModel:

Now declare the properties in the EmpModel class with a DataAnnotations attribute to validate the values assigned to the properties. It is the same as get and set properties as we used in normal applications. After declaring the properties the EmpModel class will look as in the following.
EmpModel.cs
  1. using System.ComponentModel.DataAnnotations;
  2. namespace InsertingDataintoDatabaseUsingMVC.Models
  3. {
  4.     public class EmpModel
  5.     {
  6.        [Display(Name=“First Name”)]
  7.        [Required (ErrorMessage=“First Name is required.”)]
  8.        public string FName
  9.         {
  10.             get;
  11.             set;
  12.         }
  13.          [Display(Name = “Middle Name”)]
  14.         public string MName
  15.         {
  16.              getset;
  17.         }
  18.        [Display(Name = “Last Name”)]
  19.        [Required(ErrorMessage = “Last Name is required.”)]
  20.         public string LName
  21.         {
  22.              getset;
  23.          }
  24.        [Display(Name = “Email Address”)]
  25.        [DataType(DataType.EmailAddress,ErrorMessage=“Invalid emaild address”)]
  26.        [Required(ErrorMessage = “Emailld is required.”)]
  27.         public string EmailId
  28.         {
  29.            getset;
  30.        }
  31.     }
  32. }

The attributes you have seen on each property is included in the namespace System.ComponentModel.DataAnnotations that validates the input values at the client side as well as the server side at the same time time as using the jQuery library files. We will learn it in detail in my next article. I hope you have understood the concept of model.

Step 4
Now to create the Controller.

To create the controller, right-click on the Controller folder and click on Add new controller. It shows the following window, provide a name for the controller with the suffix controller and then choose empty MVC controller from templates as in the following screenshot:

After clicking on the Add button the following default code will be added into the controller class that returns an empty view:
  1. public class EmpController : Controller
  2. {
  3.     //
  4.     // GET: /EMP1/
  5.     public ActionResult Index()
  6.     {
  7.         return View();
  8.     }
  9. }

Now remove the preceding Index Action method from the preceding Empcontroller class and add the following Action method named AddNewEmployee and the EmpModel reference:

  1.  public class EmpController : Controller
  2.  {
  3.      public ActionResult AddNewEmployee(EmpModel Emp)
  4.      {
  5.         return View();
  6.        }
  7. }
Step 5
Now to add a View. Now that we have created the Controller, let us create the view for the AddNewEmployee action method. Right-click near to the ActionResult method definition and click “Add View…:”.
Then use the following procedure:
  1. Provide the view name in the free text area as shown in the following window. By default the view is created with the name ActionResult method.
  2. Choose one of the view engines from the given dropdownlist that are Razor or Aspx ,we have selected the Razor view engine.
  3. Check the checkBox to create a strongly-typed view.
  4. Now choose the model class for a strongly-typed view from the given dropdownlist. In our example we have choosen EmpModel that we created.
  5. Choose the Scaffold template that will create an automated UI depending on the model class. In our example we have chosen to create a template.
  6. Check the References script libraries checkBox that will add jQuery libraries to validate the model input values during execution.
  7. Now check the user layout or master page layout checkBox that will add a shared page that provides a consistent look across the applications.
  8. Choose the view using the browse button of the following window. In our example we have selected _Layout.cshtml.
  9. Click on the Add button.
 

Now after clicking on the Add button it creates the following view with a rich UI design. The following default code gets generated in the view:

  1. @model InsertingDataintoDatabaseUsingMVC.Models.EmpModel
  2. @{
  3.     ViewBag.Title = “Add Employee”;
  4.     Layout = “~/Views/Shared/_Layout.cshtml”;
  5. }
  6. <h2>AddNewEmployee</h2>
  7. @using (Html.BeginForm()) {
  8.     @Html.ValidationSummary(true)
  9.     <fieldset>
  10.         <legend>EmpModel</legend>
  11.         <div class=“editor-label”>
  12.             @Html.LabelFor(model => model.FName)
  13.         </div>
  14.         <div class=“editor-field”>
  15.             @Html.EditorFor(model => model.FName)
  16.             @Html.ValidationMessageFor(model => model.FName)
  17.         </div>
  18.         <div class=“editor-label”>
  19.             @Html.LabelFor(model => model.MName)
  20.         </div>
  21.         <div class=“editor-field”>
  22.             @Html.EditorFor(model => model.MName)
  23.             @Html.ValidationMessageFor(model => model.MName)
  24.         </div>
  25.         <div class=“editor-label”>
  26.             @Html.LabelFor(model => model.LName)
  27.         </div>
  28.         <div class=“editor-field”>
  29.             @Html.EditorFor(model => model.LName)
  30.             @Html.ValidationMessageFor(model => model.LName)
  31.         </div>
  32.         <div class=“editor-label”>
  33.             @Html.LabelFor(model => model.EmailId)
  34.         </div>
  35.         <div class=“editor-field”>
  36.             @Html.EditorFor(model => model.EmailId)
  37.             @Html.ValidationMessageFor(model => model.EmailId)
  38.         </div>
  39.         <p>
  40.             <input type=“submit” value=“Save details” />
  41.         </p>
  42.     </fieldset>
  43. }
  44. @if (ViewBag.Message != null)
  45. {
  46.    <span style=“color:Green”>@ViewBag.Message</span>
  47. }
  48. @section Scripts {
  49.     @Scripts.Render(“~/bundles/jqueryval”)
  50. }
Now we have created the model, view and controller. After adding all these things the Solution Explorer will look like the following:
 
Step 6
Now to configure the default routing. Run the application, then you will get the following error.
The preceding error occured because we did not configure the default routing specifying the page to be shown by default after the user visits the application. To configure it find RouteConfig.cs under App_Start folder:

Now write the following code in the RouteConfing.cs file:
  1. public class RouteConfig
  2.    {
  3.        public static void RegisterRoutes(RouteCollection routes)
  4.        {
  5.            routes.IgnoreRoute(“{resource}.axd/{*pathInfo}”);
  6.            routes.MapRoute(
  7.                name: “Default”,
  8.                url: “{controller}/{action}/{id}”,
  9.                defaults: new { controller = “EMP”, action = “AddNewEmployee”, id = UrlParameter.Optional }
  10.            );
  11.        }
  12.    }
In the preceding code in the defaults section:
  • EMP: our controller name
  • AddNewEmployee: our action (method) name
  • Id: optional parameter for the action (method)
Step 7
Now run the application. On pressing F5 the following page will open and try to click on the Save details button by entering invalid data; it shows the following error:
Now our model validated successfully depending on our set validation in the model class.
Step 8
Create the table in the database. To store the preceding form details in the database create the following table:
I hope you have created the same table as above.
Step 9
Create a Stored Procedure. To insert the data into the table, create the following Stored Procedure.
  1. Create Procedure InsertData
  2. (
  3. @FName varchar(50),
  4. @MName varchar(50),
  5. @LName varchar(50),
  6. @EmailId  varchar(50)
  7. )
  8. as begin
  9. Insert into Employee (FName,MName,LName,EmailId ) values(@FName,@MName,@LName,@EmailId )
  10. End
Step 10
Configure the AddEmployee action method. To insert the data into the database write the following code in the controller:
  1. ///<summary>
  2.      ///Action method which
  3.      ///insert the data into database by capturing
  4.      ///Model values which comes from user as input
  5.      ///</summary>
  6.      public ActionResult AddNewEmployee(EmpModel Emp)
  7.      {
  8.         //To Prevent firing validation error on first page Load
  9.          if (ModelState.IsValid)
  10.          {
  11.              connection();
  12.              SqlCommand com = new SqlCommand(“InsertData”, con);
  13.              com.CommandType = CommandType.StoredProcedure;
  14.              com.Parameters.AddWithValue(“@FName”, Emp.FName);
  15.              com.Parameters.AddWithValue(“@MName”, Emp.MName);
  16.              com.Parameters.AddWithValue(“@LName”, Emp.LName);
  17.              com.Parameters.AddWithValue(“@EmailId”, Emp.EmailId);
  18.              con.Open();
  19.              int i = com.ExecuteNonQuery();
  20.              con.Close();
  21.              if (i >= 1)
  22.              {
  23.                  ViewBag.Message = “New Employee Added Successfully”;
  24.              }
  25.          }
  26.          ModelState.Clear();
  27.          return View();
  28.      }
Step 11
Insert valid data and submit. Insert the valid data into the form and press the Save button then after saving the details the following message will be shown:

Now the complete code of Emp controller will look as in the following:

  1. using System.Web.Mvc;
  2. using InsertingDataintoDatabaseUsingMVC.Models;
  3. using System.Data.SqlClient;
  4. using System.Configuration;
  5. using System.Data;
  6. namespace InsertingDataintoDatabaseUsingMVC.Controllers
  7. {
  8.     public class EmpController : Controller
  9.     {
  10.       private SqlConnection con;
  11.      private void connection()
  12.         {
  13.             string constr = ConfigurationManager.ConnectionStrings[“getconn”].ToString();
  14.             con = new SqlConnection(constr);
  15.         }
  16.        ///<summary>
  17.         ///Action method which
  18.         ///insert the data into database by capturing
  19.         ///Model values which comes from user as input
  20.         ///</summary>
  21.         public ActionResult AddNewEmployee(EmpModel Emp)
  22.         {
  23.            //To Prevent firing validation error on first page Load
  24.             if (ModelState.IsValid)
  25.             {
  26.                 connection();
  27.                 SqlCommand com = new SqlCommand(“InsertData”, con);
  28.                 com.CommandType = CommandType.StoredProcedure;
  29.                 com.Parameters.AddWithValue(“@FName”, Emp.FName);
  30.                 com.Parameters.AddWithValue(“@MName”, Emp.MName);
  31.                 com.Parameters.AddWithValue(“@LName”, Emp.LName);
  32.                 com.Parameters.AddWithValue(“@EmailId”, Emp.EmailId);
  33.                 con.Open();
  34.                 int i = com.ExecuteNonQuery();
  35.                 con.Close();
  36.                 if (i >= 1)
  37.                 {
  38.                     ViewBag.Message = “New Employee Added Successfully”;
  39.                 }
  40.             }
  41.             ModelState.Clear();
  42.             return View();
  43.         }
  44.     }
  45. }
Now let us confirm the details in the database table:

Now from the preceding table records the record is inserted successfully.
Note:
  • Configure the database connection in the web.config file depending on your database server location.
  • Download the Zip file of the sample application for a better understanding .
  • Since this is a demo, it might not be using proper standards so imrove it depending on your skills
  • This application is created completely focusing on beginners.

CRUD Operations in MVC

This article will take you on a journey of MVC Create, Replace, Update and Delete (CRUD) operations. I’ll show you step-by-step operations using simple images and charts. So buckle up for that journey.

Agenda

  • Overview
  • Introduction
  • Procedure
    • Creating a MVC Project
    • Adding EDM
    • DB Settings
    • Adding a controller
    • (Ref code Snippet)
    • Routing
  • Conclusion


Overview

This article will explain MVCs base operations rather than any fundamentals and anything like that so if you are new to MVC then I’ll suggest you first explore the basics, it will hardly take a few hours then you can read this article.

In spite of these entire one more thing, I’m using MVC4 here for these operations. You can use any version but in the earlier versions, like in case of VS’8 and below you need to install templates first, then you can have fun.

Introduction

This article is all about ASP.NET MVC CRUD operations using Entity Data Model (DB First Approach). This will explain it in baby steps using images. One more interesting fact about this article is, you are not going to write even a single line of code.

Here we go.

Procedure

I am dividing this into 7 major steps, these steps will contain several sub steps. The major steps of this project are:

Step 1: Creating a MVC Project

Just click on File > New project.

On clicking New Project you will get a window like this, in that window does these tiny steps:

In this window simply fill in the project name depending on you; in my case it is “CRUDoperation” and then click on OK.

On clicking OK a window like this will pop up on your screen.

In that window from Project Templates you have several options like:

  • Empty

    (Simply a blank view)

  • Basic

    (Contains a few options and a few folders)

  • Internet Template

    (Contains all the folders for global use)

  • Intranet Template

    (Contains all the folders but for a specific scenario)

  • Mobile Application

    (For mobile app dev)

  • Web API

    (Extra features of Razor, Routing and others)

  • Single Page Application

    (For single page app dev)

  • Facebook Application

    (Facebook app dev)

From those select Intranet Application and then from View Engine select Razor Engine View (it’s the default actually).

Then after View Engine there is an option for Create a Unit Test Project, this option is for creating a step-wise unit test for your project. (Microsoft provides that functionality in the default in MVC. It’s not mandatory to create a unit test project but in my case I am using it.)

Now just create a Test Project and click OK.

On clicking okay it will take a while to create the project.

Then you will get a window containing these folders:

  • Solution Explorer
  • Test Explore
  • Class View
  • Properties

From these options select Solution Explorer, click CRUDoperations, just click on that and you will get a view of this window.

Step 2: Adding EDM

(For data I am selecting ADO.Net Entity Data Model, you can select several other available options.)

Just do this procedure, right-click on CRUDoperation > Add New Item

Then follow this procedure, respectively:


Simply name your EDM model (in my case it’s EDM) and then click OK.

Now you will get a pop-up window, named Choose Model Contents. This contains the following 2 types of model contents:

  • Generate from Database (DB first approach)
  • Empty Model (Modal first approach)

(In my case I am using the DB first approach (Generate from Database), just select it and click on “Next” )

On clicking Next, you will get a option Choose Your Data Connection, from here just select a connection string if you already have one or else you can go with New Connection.

Just click on New Connection.

Now set your connection properties as in the following:

Just fill in all the required details of your server and database and proceed further.

Microsoft has provided a beautiful option to check your connection, down the pop box. Just click on Test Connection, if everything until now will be smooth and clear then you will get a pop-up box saying- “Test connection Succeeded” as shown below.

(Otherwise you need to recheck your DB and server details again and try to establish the connection again and then you can check your connection.)

Now you can see the generated Data Connection in the box as shown below. Just select a few further settings like Security and march forward.

Just click on “Finish”.

On clicking Finish it will show a box saying Model Wizard, just select any of the wizards depending on availability (in my case I am selecting Entity Framework 5.0).

Click Next for further settings.

Step 3: Selecting you DB Settings

Now in this step just click on Table, dbo (as I already have a table in my DB, but if you created a Stored Procedure or view then select it respectively).

In model Namespace just leave it as it is or change it depending on you. In my case its TestDBModel, click Finish.

This will redirect you to a page containing a structure diagram of all the available tables in that select DB in step 3. You remove others depending on you (in my case it’s Employee having the columns EmployeeId, FirstName, LastName, Age, Project and Address).

You don’t need to do anything here, just chill it’s more than half done.

You can see all these EDM files in the Solution Explorer, having all the required fields, pages and reference files of all your available tables with “.cs extension”.

Note: Before proceeding to Step 5, build the project. It’s recommended.

Step 4: Adding a Controller

For adding a controller do this procedure:

On clicking Add Controller, it will redirect to you to this window, having these fields:

  • Controller Name
  • Scaffolding Template
  • Model Class
  • Data Context Class
  • Views

Just modify entries depending on you. (My entries are shown below.)

Now click Add.

It will redirect you to a page named “CRUDcontroller.cs” (as I modified it). This page contains all the CRUD operation related functions and two others, such as:

  • Index.cs
  • Details.cs

Reference Code | Snippet

This is of the CRUDcontoller.cs page that represents all the base operations with their respective get and set methods.

  1. using System;
  2. using System.Collections.Generic;
  3. using System.Data;
  4. using System.Data.Entity;
  5. using System.Linq;
  6. using System.Web;
  7. using System.Web.Mvc;
  8. namespace CRUDoperations.Controllers
  9. {
  10.     public class CRUDController : Controller
  11.     {
  12.         private TestDBEntities db = new TestDBEntities();
  13.         //
  14.         // GET: /CRUD/
  15.         public ActionResult Index()
  16.         {
  17.             return View(db.EMPLOYEEs.ToList());
  18.         }
  19.         //
  20.         // GET: /CRUD/Details/5
  21.         public ActionResult Details(string id = null)
  22.        {
  23.             EMPLOYEE employee = db.EMPLOYEEs.Find(id);
  24.             if  (employee == null)
  25.             {
  26.                 return HttpNotFound();
  27.             }
  28.             return View(employee);
  29.         }
  30.         //
  31.         // GET: /CRUD/Create
  32.         public ActionResult Create()
  33.         {
  34.             return View();
  35.         }
  36.         //
  37.         // POST: /CRUD/Create
  38.         [HttpPost]
  39.         [ValidateAntiForgeryToken]
  40.         public ActionResult Create(EMPLOYEE employee)
  41.         {
  42.             if (ModelState.IsValid)
  43.             {
  44.                 db.EMPLOYEEs.Add(employee);
  45.                 db.SaveChanges();
  46.                 return RedirectToAction(“Index”);
  47.             }
  48.             return View(employee);
  49.         }
  50.         //
  51.         // GET: /CRUD/Edit/5
  52.         public ActionResult Edit(string id = null)
  53.         {
  54.             EMPLOYEE employee = db.EMPLOYEEs.Find(id);
  55.             if (employee == null)
  56.             {
  57.                 return HttpNotFound();
  58.             }
  59.             return View(employee);
  60.         }
  61.         //
  62.         // POST: /CRUD/Edit/5
  63.         [HttpPost]
  64.         [ValidateAntiForgeryToken]
  65.         public ActionResult Edit(EMPLOYEE employee)
  66.         {
  67.             if (ModelState.IsValid)
  68.             {
  69.                 db.Entry(employee).State = EntityState.Modified;
  70.                 db.SaveChanges();
  71.                 return RedirectToAction(“Index”);
  72.             }
  73.             return View(employee);
  74.         }
  75.         //
  76.         // GET: /CRUD/Delete/5
  77.         public ActionResult Delete(string id = null)
  78.         {
  79.             EMPLOYEE employee = db.EMPLOYEEs.Find(id);
  80.             if (employee == null)
  81.             {
  82.                 return HttpNotFound();
  83.             }
  84.             return View(employee);
  85.         }
  86.         //
  87.         // POST: /CRUD/Delete/5
  88.         [HttpPost, ActionName(“Delete”)]
  89.         [ValidateAntiForgeryToken]
  90.         public ActionResult DeleteConfirmed(string id)
  91.         {
  92.             EMPLOYEE employee = db.EMPLOYEEs.Find(id);
  93.             db.EMPLOYEEs.Remove(employee);
  94.             db.SaveChanges();
  95.             return RedirectToAction(“Index”);
  96.         }
  97.         protected override void Dispose(bool disposing)
  98.         {
  99.             db.Dispose();
  100.             base.Dispose(disposing);
  101.         }
  102.     }
  103. }

You can see the controller info on the preceding page but if you want to see their views then simply click on Views, it will show you a separate folder named CRUD and all the pages for the CRUD operations.

You can see the razor engine functionality in any of the pages, as shown below. This page shows a view of the create page, I’ll show you that page later in this article.

Step 5: Routing

Routing is itself a complex mechanism, but here I am showing you only the base access functionality. For that base functionality, follow this procedure:

On clicking Route.Config.CS it will redirect you to that window (below). You need to make some changes in that page such as:

  • Controller Name
  • Action

In my case I changed it to Controller = “CRUD”.

All other options are the default for the operation.

Just run that page and you will see a page like this. This is your default page of CRUD operations. You can access all the other options.

This is the base structure of the create page, as I was talking about in Step 5.

You can create entries from here.

Conclusion

Congratulation!

You have just performed CRUD operations using ASP.NET MVC without writing a single line of code.

Entity Framework Code First With ASP.Net MVC

Introduction

ADO.NET Entity Framework is an ORM, Object Relational Mapping. It basically generates business objects and entities depending on the database tables.

What is ORM

In simple words, ORM maps our model class properties with the database table.

There are three approaches in accessing the database using Entity Framework.

  1. Database first
  2. Model First
  3. Code First

The purpose of this article introduces yourself to the Code first approach.

Topics to be covered

  1. Introduction to Entity Framework code first.
  2. CRUD operations using Entity Framework Code first.
  3. Data Annotations and Updating the database on modelchanges
  4. Creating repository with MVC that makes use of Entity Framework.
  5. Creating relationships (one-many, many – many, one –one) between tables using code first approach.
  6. Inheritance in Entity Framework.

I will be covering the topic 1 in this article and then the further topics will be covered in the next set of articles.

Pre-requisites

You will need to have Visual Studio 2010 or higher installed to complete this walk-through.

If you are using Visual Studio 2010, you also need to have Nuget installed.

I will be covering the topic 1 in this article and then the further topics will be covered in the next set.

Let’s start

Fire up Visual Studio, I will be using Visual Studio 2012 for this article, you can use the one of your choice.

Go to File, New, then Project and select C# and select Web in the templates, then select ASP.NET MVC4 Web Application.

Name the application “CodeFirstDemo”.

mvc web application
From the following model box, select Internet Application and click OK.

internet application
Our application environment is ready to go further.

code first demo
From the Solution Explorer, right-click the Models folder and add a class, name the class Artist.cs.

Add two properties, AritistID and ArtistName as in the following screenshot:

create model

Add another class to the Models folder and name it CodeFirstDataContext.cs.

Inherit from the DbContext class into the codeFirstDataContext.cs and add the following property.

public DbSet<Artist> Artists {get;set;}

Our Data Context class will look like this, ensure you add the reference to System.Data.Entity.

data context
Right-click the solution and build it.

Our Model is ready!

Next we need to add a controller and a view to present the artists on the browser.

Let’s create a controller by right-clicking on the controller folder then select Add Controller.

Name the controller ArtistController and from the template, choose Empty MVC controller.

add controller
Click Add.

Reference the model folder as in the following ArtistController.

using CodeFirstDemo.Models;

And then instantiate the datacontext we created in the Model folder as in the following:

CodeFirstDataContext context = new CodeFirstDataContext();

And then in the index view add the code to return the view with the list of artists.

Our ArtistController class will look like the following:

namespace
Now, let’s add our index view to list the artists.

Right-click on the index method in ArtistController and click Add View.

The name of the view will be automatically displayed as Index. Select the strongly-typed view and artist as our Model class and from the scaffold option select list.

add index
Click Add. An Index view will be generated as in the following screenshot:

Index view
Click F5 to run the application and open the Artist/Index in the browser.

article
If you get this page, we are done.

Now let’s create some artists. If you click create new link in the index, you will get an error, obviously because there is no code written and no matching view found for creating a new link.

Before that, the question is, where is the database?

Stop the application and go to Solution Explorer, click the icon as in the following image. Show all files on top of the Solution Explorer.

solution explorer

Now you will find a database file in the app-data folder.

app data

Double-click on it, it will open the file in the Server Explorer, drill down into it.

table

Wow, everything is there! How did that happen?

The Entity Framework created a database automatically from the model class artist using the datacontext we wrote. DbContext is the class that we inherited to our modelContext created a database for us based on the information we provided.

By convention, the name of the class becomes the table name and the properties become the columns.

ArtistID becomes the primary key that is the convention followed by Entity Framework if a field name has the suffix ID with a class name or just an ID, the DBContext class will automatically consider that field to br the primary key.

  • If a local SQL Express instance is available (installed by default with Visual Studio 2010) then Code First has created the database on that instance.
  • If SQL Express isn’t available then Code First will try and use LocalDb (installed by default with Visual Studio 2012).
  • The database is named after the fully-qualified name of the derived context, in our case that is CodeFirstDemo.Models.CodeFirstDataContext.

We can also have our own database server and we can pass that connection string to the web.config file and we can reference that in the DataContext class as in the following code snippet:

model

Now let’s add a create method to the Artist Controller.

method

Right-click on the Create method and add a view and select Create in the scaffold template as in the following screenshot:

add view
Click Add.

Create View is generated as in the following code snippet:

design page

Run the application and open the index page, click on the create new link, the browser will present the page as in the following screenshot:

create

Now we need to write a controller method for the create method to post the data back to the database. Let’s do that!

Open the Artist controller and add a HTTP post method for Create.

code

Run the application and create a new artist. Once the artist is created it will redirect to the index page and show the created artist as in the following screenshot:

index

Conclusion

We defined a model using a class. We created a datacontext for that model class that creates a database for us based on the default connection string provided in the web.config. We created a controller for Artist and displayed the index for the list of artists. Also, we made a create view for creating the artists and wrote the create post method to save the artist back to the database using the DataContext Class.

I hope you enjoyed the article. Share your comments or views.

Deep Freeze ইন্সটল করে আপনার পিসিকে রাখুন আজীবন সুপার ফাস্ট, ভাইরাস মুক্ত, এবং ব্যবহার করুন সকল ট্রায়াল ভার্সন সফটওয়্যার সারা জীবনের জন্যে!

বন্ধুরা আজ আমি এন্ড্রয়েড সফটওয়্যার অথবা ইন্টারনেটে আয় নিয়ে কোনো কিছু লিখছিনা, আজ লিখবো উইন্ডোজ সফটওয়্যার নিয়ে।

  • কিভাবে আজীবন আপনার পিসিকে সুপার ফাস্ট রাখবেন!
  • কিভাবে আজীবন আপনার পিসিকে ভাইরাস মুক্ত রাখবেন!
  • কিভাবে ট্রায়াল ভার্সন সফটওয়্যার আজীবন ব্যবহার করবেন!

হ্যা, এতক্ষন যার গুনগান গাইছিলাম উনার নাম নিশ্চই জানতে ইচ্ছে করছে? উনার নামটা হচ্ছে Deep Freeze সাইজ মাত্র ২২ এম্বি। আমি এক্সপি এবং সেভেনে ব্যবহার করে দেখেছি ওকে আছে, এইটের কথা বলতে পারবোনা আপনি ট্রাই করে দেখতে পারেন। আগে সফটওয়্যারটি ডাউনলোড করবেন, নাকি সম্পূর্ণ টিউন পড়বেন। সেটা আপনার ব্যাপার, আমি কিন্তু ডাউনলোড লিংক এখানেই দিয়ে গেলাম। Download Deep Freeze For windows সফটওয়্যারটি ইন্সটল করার আগে আপনাকে কিছু কাজ করে নিতে হবে। যেমন-

  • প্রথমে নতুন করে উইন্ডোজ সেটাপ দেওয়া
  • এন্টিভাইরাস দিয়ে স্কেন করে ভাইরাস ডিলেট করা
  • CCleaner দিয়ে সি ড্রাইভ ক্লিন করা ও রেজিস্ট্রি ক্লিন করা

নতুন উইন্ডোজ সেটাপ দেবার পর যদি আপনার মনে হয় পিসির পারফরমেন্স এখনো ভালোই আছে তবে এখান থেকেই শুরু করতে পারেন। তারপর আপনি যে সফটওয়্যার গুলো সবসময় ব্যবহার করেন সেগুলো ইন্সটল করে নিন। তার কারণ ডিপ ফ্রিজ ইন্সটল করার পর আপনি নতুন করে আর কোন সফটওয়্যার পিসিতে ইন্সটল করতে চাইলে, একটু সমস্যা আছে। এর সমাধানটা আমি নিচের দিকে উল্যেখ করবো।

এবার শুরু করি কিভাবে সফটওয়্যারটি ব্যবহার করবেন। আশা করছি Deep Freeze ডাউনলোড কাজ ইতিমধ্যেই সেরে ফেলেছেন। এবার ইন্সটল করার পালা! প্রথমে আমার দেয়া জিপ ফাইলটাকে আনজিপ করুন। Deep Freeze ফোল্ডারটি ওপেন করে New text Document ওপেন করুন।এখান থেকে ফুল ভার্সন করার কিগুলো আগে কপি করে নিন। নিচের ছবির মত

Deep Freeze ইন্সটল করে আপনার পিসিকে রাখুন আজীবন সুপার ফাস্ট, ভাইরাস মুক্ত, এবং ব্যবহার করুন সকল ট্রায়াল ভার্সন সফটওয়্যার সারা জীবনের জন্যে!

এবার সেটাপ ফাইলটার উপর রাইটে ক্লিক করে ওপেন করুন নিচের ছবির মতো

Deep Freeze ইন্সটল করে আপনার পিসিকে রাখুন আজীবন সুপার ফাস্ট, ভাইরাস মুক্ত, এবং ব্যবহার করুন সকল ট্রায়াল ভার্সন সফটওয়্যার সারা জীবনের জন্যে!

তারপর রান এ ক্লিক করুন নিচের ছবির মতো

Deep Freeze ইন্সটল করে আপনার পিসিকে রাখুন আজীবন সুপার ফাস্ট, ভাইরাস মুক্ত, এবং ব্যবহার করুন সকল ট্রায়াল ভার্সন সফটওয়্যার সারা জীবনের জন্যে!

তারপর নেক্সট এ ক্লিক করুন নিচের ছবির মতো

Deep Freeze ইন্সটল করে আপনার পিসিকে রাখুন আজীবন সুপার ফাস্ট, ভাইরাস মুক্ত, এবং ব্যবহার করুন সকল ট্রায়াল ভার্সন সফটওয়্যার সারা জীবনের জন্যে!

তারপর I Accept The Terms এ ক্লিক করে Next এ ক্লিক করুন নিচের ছবির মতো

Deep Freeze ইন্সটল করে আপনার পিসিকে রাখুন আজীবন সুপার ফাস্ট, ভাইরাস মুক্ত, এবং ব্যবহার করুন সকল ট্রায়াল ভার্সন সফটওয়্যার সারা জীবনের জন্যে!

আগের কপি করা কিগুলো এখানে পেস্ট করুন নিচের ছবির মতো

Deep Freeze ইন্সটল করে আপনার পিসিকে রাখুন আজীবন সুপার ফাস্ট, ভাইরাস মুক্ত, এবং ব্যবহার করুন সকল ট্রায়াল ভার্সন সফটওয়্যার সারা জীবনের জন্যে!

শুধুমাত্র C ড্রাইভ এর ঠিক চিহ্ন রেখে অন্য ড্রাইভ গুলোর ঠিক চিহ্ন গুলো ক্লিক করে করে উঠিয়ে দিয়ে, Next এ ক্লিক করুন নিচের ছবির মতো

Deep Freeze ইন্সটল করে আপনার পিসিকে রাখুন আজীবন সুপার ফাস্ট, ভাইরাস মুক্ত, এবং ব্যবহার করুন সকল ট্রায়াল ভার্সন সফটওয়্যার সারা জীবনের জন্যে!

Install এ ক্লিক করলে ইন্সটল প্রক্রিয়া শুরু হবে নিচের ছবির মতো

Deep Freeze ইন্সটল করে আপনার পিসিকে রাখুন আজীবন সুপার ফাস্ট, ভাইরাস মুক্ত, এবং ব্যবহার করুন সকল ট্রায়াল ভার্সন সফটওয়্যার সারা জীবনের জন্যে!

এবার কম্পিউটারটি অটো রিস্টার্ট হবে, ওপেন হবার পরে নিচের ছবির মতো একটা মেসেজে আসবে আপনি Yes এ ক্লিক করুন

Deep Freeze ইন্সটল করে আপনার পিসিকে রাখুন আজীবন সুপার ফাস্ট, ভাইরাস মুক্ত, এবং ব্যবহার করুন সকল ট্রায়াল ভার্সন সফটওয়্যার সারা জীবনের জন্যে!

এবার নিচের ছবির মতো ২বার নতুন পাসওয়ার্ড দিয়ে আবার Apply & Reboot ক্লিক করুন। কম্পিউটারটি অটো রিস্টার্ট হবে, ব্যাস কাজ শেষ। এবার মজা উপভোগ করুন। মজাই মজা।

Deep Freeze ইন্সটল করে আপনার পিসিকে রাখুন আজীবন সুপার ফাস্ট, ভাইরাস মুক্ত, এবং ব্যবহার করুন সকল ট্রায়াল ভার্সন সফটওয়্যার সারা জীবনের জন্যে!

  • এবার আপনার কম্পিউটার যেমন আছে সাড়া জীবন তেমন থাকবে!
  • পারফরমেন্স একচুল ও নরচর হবেনা!
  • জীবনেও ভাইরাস আপনার কম্পিউটারে ঢুকতে পারবেনা!
  • এমনকি আপনার উইন্ডোজ ও যেমন আছে তেমন থাকবে!
  • আইপি এস না থাকলেও আপনার উইন্ডোজ দূর্বল হবেনা!
  • রিস্টার্ট দিলেই আপনি পাবেন নতুন এক উইন্ডোজ!

স্ক্রীনশট দেখে যদি ইন্সটল করতে যদি সমস্যা হয় তবে এই ভিডিও দেখে দেখে সহজেই ইন্সটল করে ফেলুন

এবার বলবো এই সফটওয়্যার ইন্সটল দেবার পর নতুন কোনো সফটওয়্যার কিভাবে ইন্সটল করবেন। Shift key চেপে ধরুন নিচের ছবির মতো

Deep Freeze ইন্সটল করে আপনার পিসিকে রাখুন আজীবন সুপার ফাস্ট, ভাইরাস মুক্ত, এবং ব্যবহার করুন সকল ট্রায়াল ভার্সন সফটওয়্যার সারা জীবনের জন্যে!

কম্পিউটারের নিচের ডান দিকে টাস্কবারের ডিপ ফ্রিজ আইকনে ডাবল ক্লিক করুন। নিচের ছবির মতো

Deep Freeze ইন্সটল করে আপনার পিসিকে রাখুন আজীবন সুপার ফাস্ট, ভাইরাস মুক্ত, এবং ব্যবহার করুন সকল ট্রায়াল ভার্সন সফটওয়্যার সারা জীবনের জন্যে!

প্রথমে কিবোর্ড ক্লোজ করুন। তারপর পাসওয়ার্ড ঘরে সেইযে ডিপ ফ্রিজ ইন্সটল করার সময় ২বার পাসওয়ার্ড দিয়েছিলেন মনে আছে, সেই পাসওয়ার্ড এখানে দিন, নিচের ছবির মতো।

Deep Freeze ইন্সটল করে আপনার পিসিকে রাখুন আজীবন সুপার ফাস্ট, ভাইরাস মুক্ত, এবং ব্যবহার করুন সকল ট্রায়াল ভার্সন সফটওয়্যার সারা জীবনের জন্যে!

এবার যে উইন্ডো আসবে সেখান থেকে Boot From Thawed সিলেক্ট করে Apply & Reboot এ ক্লিক করুন নিচের ছবির মতো

Deep Freeze ইন্সটল করে আপনার পিসিকে রাখুন আজীবন সুপার ফাস্ট, ভাইরাস মুক্ত, এবং ব্যবহার করুন সকল ট্রায়াল ভার্সন সফটওয়্যার সারা জীবনের জন্যে!

এবার কম্পিউটার অটোমেটিক রিস্টার্ট হবে, ওপেন হলে নিচের দিকে দেখবেন টাস্কবারে Deep Freeze আইকনটাতে x cross চিহ্ন এসেছে, তার মানে এটা এখন ডিজাবল আছে। এখন অন্য যেকোনো সফটওয়্যার নতুন করে ইন্সটল করতে পারবেন। কোন সমস্যা হবেনা।

নতুন সফটওয়্যার ইন্সটল করার পর, আবার এই Deep Freeze সফটওয়্যার টিকে ডিজাবল থেকে এনাবল করুন। এটি করতে Shitft key চেপে ধরে আগের মতো, নিচের টাস্কবারের Deep Freeze আইকনটাতে ডাবল ক্লিক করুন। তারপর পাসওয়ার্ড দিয়ে ok করে উপরের অপশন boot Frozen এ ক্লিক করে, Apply & Reboot এ ক্লিক করুন, ব্যাস কাজ শেষ।

বিঃদ্রঃ ভুলেও C ড্রাইভে কোন কিছু সেভ করে রাখবেননা! কারণ রিস্টার্ট দিলে সেভ করা ফাইল খুজে পাবেননা। C ড্রাইভ ছাড়া অন্য যেকোনো ড্রাইভে সেভ করতে পারবেন, কোনো সমস্যা হবেনা

How to use Miracast to mirror your device’s screen wirelessly on your TV—even 4K

microsoft-screensharing-two-photos-100528772-large.jpg

After the Wi-Fi Alliance announced the finalization of the Miracast wireless display standard at CES 2013, a plethora of Miracast-enabled devices and receivers followed, and include newer devices like Microsoft’s Surface Pro (2017) and Amazon’s Fire TV stick. But while Miracast continues to be developed—as of July 2017, Miracast hardware will support HD and 4K streaming, for example—it’s also lost some support to competing technologies. Keep reading to figure out how Miracast could work for you.

TABLE OF CONTENTS

  • How Miracast works
  • What you need to use Miracast (it’s complicated)
  • Miracast receivers and adapters

How Miracast works

Users can wirelessly mirror the display of their Miracast-certified phone, tablet, or PC to any Miracast-capable receiver like a TV, projector, or monitor. What you see on your device is exactly what will be displayed on your TV (albeit with a smidgen of input lag). You can also use a Miracast display as an extended PC monitor.

wi fi direct

At the core of this technology is the Wi-Fi Direct standard, which allows for point-to-point connections between devices without the use of a router. From there, Miracast adds a vendor-neutral wrapper that originally supported the streaming of up to 1080p video and 5.1 surround sound. Miracast also secures that connection using WPA2 encryption, so protected content like Blu-ray and Netflix videos can flow freely across it.

The peer-to-peer nature of a Miracast connection means mirroring can be done securely and without an Internet connection. The apps and content are streamed directly from your device, instead of through an Internet service, as with Google’s Chromecast. For businesses, Miracast could make video conferencing, slide shows, and group product design that much easier. For home users, Miracast offers a great way to stream high-definition videos and photos to your television.

It works great, if all your hardware and software are on the same page. There’s the rub.

What you need to use Miracast (it’s complicated)

Of course, there’s a catch if you want to cut out streaming middlemen: Both the device you have and the device you want to display to must support Miracast.

For the device whose screen you want to mirror, support for Miracast requires three things: wireless chipset support, operating system support, and driver support. If your device doesn’t meet all three of these requirements then you’ll have to buy a Miracast adapter and upgrade your operating system (more on that below). Miracast source adapters are often bundled with Miracast receivers like Actiontec’s ScreenBeam kit.

On the software side, Miracast is supported in Windows 8.1 and Windows 10. Older Windows versions can be made to support Miracast through third-party apps. Linux distros have access to wireless display support through Intel’s open-source Wireless Display Software for Linux OS. However, we’d recommend skipping all these minefields and using an operating system that supports Miracast natively.

Android supported Miracast, in Android 4.2 (KitKat) and Android 5 (Lollipop). However, Google dropped native Miracast support in Android 6 (Marshmallow) and later. If you want to mirror the display from a newer Android phone or tablet, you’ll need to do so via Chromecast.

Neither Apple’s OS X nor iOS support Miracast. Instead, Apple has opted for its own AirPlay technology, which requires an Apple TV to mirror the display wirelessly on a television screen.

Among Windows hardware, laptops and tablets starting with Intel’s fourth- and fifth-generation Core processors and Intel’s own 7260 wireless chip supported Miracast, but the Intel technology underlying that support, WiDi, has been discontinued in favor of the Windows 8.1/10 support mentioned above. AMD Wireless Display has supported it in laptops starting with third- and fourth-generation APUs.

Still unsure whether your device supports Miracast? You can always check the box or online product description for a mention of “Miracast-certified,” or just follow the steps in the “How to use Miracast” section below to see if the option exists in your device’s settings menu.

Miracast receivers and adapters

mircast 3 of 5

The receiver side of the equation can also be complicated. Smart-TV manufacturers like Sony, LG, Samsung, Toshiba, Panasonic added Miracast to their high-end television sets some years ago, as did certain projector manufacturers, but that doesn’t mean Miracast is built into the TV or monitor you own now.

Amazon’s Fire TV devices and Roku players support screen mirroring through Miracast. Note that Fire TV devices don’t officially support mirroring from Windows, meaning you may have trouble sharing the screen from a PC to Amazon’s streaming devices.

If all else fails, you can buy a dedicated Miracast receiver dongle. Microsoft’s Wireless Display Adapter, or Actiontec’s ScreenBeam Mini2 are two choices currently available. Which one you buy largely boils down to whose ecosystem you prefer.

We’d recommend picking a first-party adapter if you can find one. For example, if you wanted to screen-beam from a Microsoft Surface Pro, you’d be best off with Microsoft’s adapter. That’s not to say third-party adapters are bad, but troubleshooting is easier when you’re working with devices from the same company.

Setup for any of these adapters is simple: Just plug the adapter into any open HDMI input port on your TV, projector, or monitor, then plug the small USB cable coming from the side of the device into the TV or an outlet. These USB cables don’t actually transfer any data; they’re there just to provide power to the adapter.

miracast 1 1 of 1

Microsoft’s Wireless Display Adapter, connected to a television.

How to use Miracast

Now that you’ve got a Miracast-capable device, power on your display, and switch the appropriate input if you’re using a streaming box or adapter.

Some adapters, like Microsoft’s, will require you to press a power button located on the physical dongle. It may take up to 90 seconds for the adapter to finish booting up, but most are faster. Your TV will then display a splash screen asking you to connect a device.

On streaming devices, you may have to navigate through some menus to enable mirroring. On the Fire TV, for instance, you must long-press the Home button, then select “Mirroring.” On Roku devices running OS 7.6, you’ll find the Screen Mirroring option under Settings > System. (This is no longer required on Roku devices running OS 7.7, which rolled out in August 2017.)

Now it’s time to head over to your source device and connect it to your adapter.

Windows 10

In Windows 10, screen mirroring lives inside the quick settings section of the Action Center. Click the speech bubble icon on the far-right side of the task bar to launch Action Center, then click the Connect button near the bottom of the screen. (If you don’t see the button, click Expand right above the quick settings section.)

miracastconnectmenu
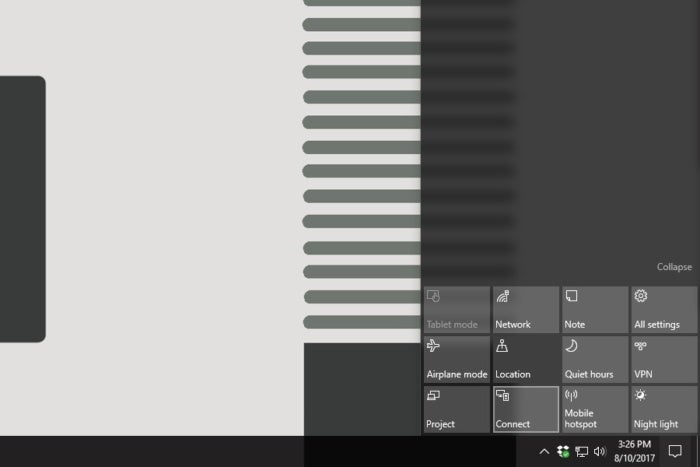
A list of available Miracast display devices should appear within this menu. Click the device name to begin the connection process.

miracastconnectmenu2
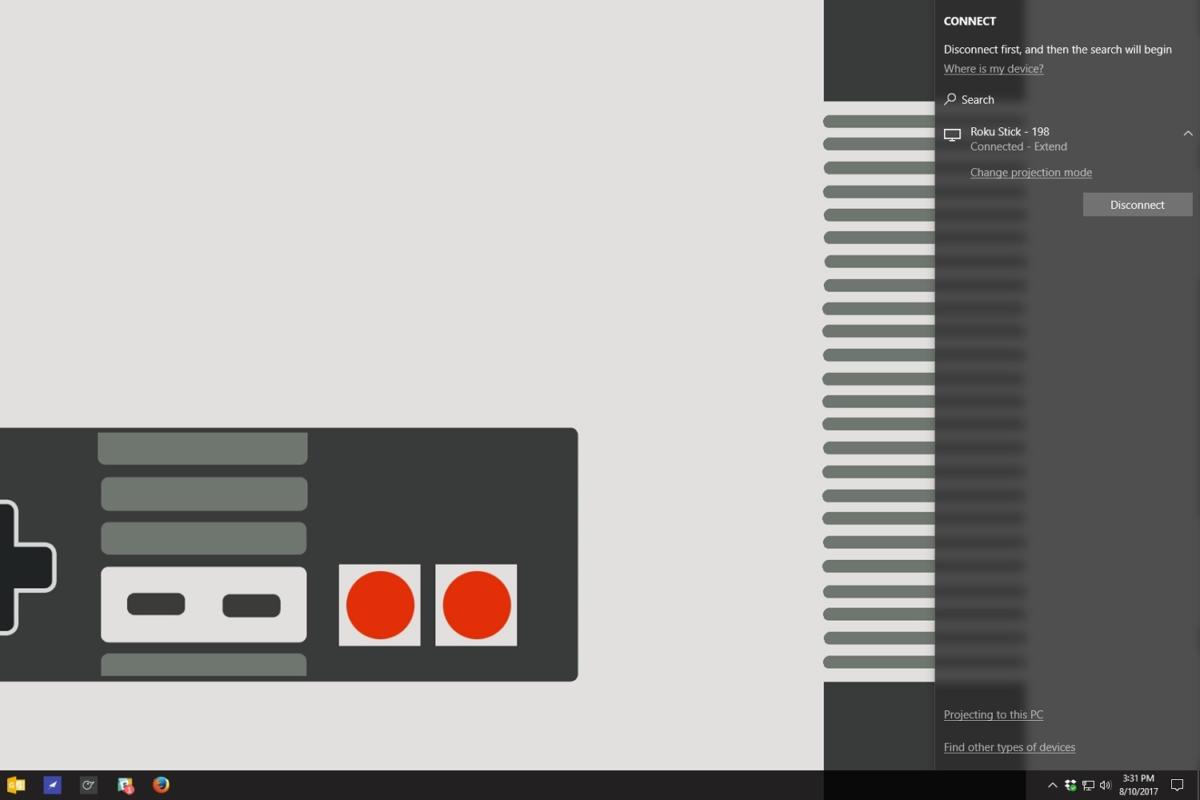
Depending on your display device, you may have to enter a PIN to verify that the connection is secure, or complete the connection on your display device. Roku, for instance, provides a mini-menu to approve the connection on a one-time or permanent basis.

After a moment, your display device will either mirror your PC or act as an extended monitor. Selecting Change projection mode in the Windows 10 Connect menu lets you choose between mirroring, monitor extension, and disabling your primary PC display. (One word of caution for multi-monitor setups: Choosing to duplicate your PC display will cause all of your monitors to show the same screen. If you want to mirror only your primary monitor, select Second-Screen Only.)

Android

miracast connect

If you have an older Android device that still supports Miracast, you’ll need to go to the Settings menu, tap Display, and then tap Wireless display. At the top of this page, toggle “Wireless display” to ON and it will scan for nearby Miracast devices. After a minute, the name of your Miracast adapter should pop up. Tap it and either your device will connect, or you’ll be prompted for the PIN code display on your TV or projector by the Miracast adapter. After you connect to the adapter your screen will be mirrored onto your display.

A final note: One issue you may encounter when mirroring to a TV is overscan. Many TVs are set to overscan their HDMI inputs, which will make the image appear zoomed-in. To fix this you’ll need to go into your TV’s options menu and set it to display on a dot-by-dot basis, rather than the stretch or zoom settings. Some Miracast adapters—again, like Microsoft’s—come with an app that can use the adapter itself to change the overscan level.

When Windows 10 takes up too much disk space, try this

Compact.exe helps reduce the size of your Windows installation, and there are other tricks, too.

windows10primary

Roelof Die Hoenderboer was having issues running Windows 10 on his 16GB SSD. 

Windows 10 works best with more disk space. While it’s not optimal to run Windows 10 from a 16GB or even 32GB SSD, the OS has some tricks up its sleeve that allow it to run on devices with skimpy storage space, such as tablets. It’s not that painful once you take the proper steps.

Live small and prosper

Microsoft designed Windows 10 so that its own files could be reduced in size without using disk compression. The overhead of unpacking stuff reduces performance somewhat, but it can mean the difference between being able to work with the device you’ve got, and having to buy a new one.

Compressing the Windows 10 files is simple: Type CMD into the search windows field, right-click on CMD and run as administrator. Once you have a command line, type in COMPACT.EXE /CompactOS:always and press Enter. To undo the whole deal, type in COMPACT.EXE /CompactOS:never. You can also opt to compress the data on your main drive.

disk-compression-100725992-medium.jpg

Disk compression is always an option, but most SSDs already use some form of compression, so this may not be as effective as on a hard drive, if at all.

How effective either of these will be depends on the media you’re using. Many SSDs already compress data so you may not see much of a reduction. In that case…

Relocate your libraries

Many low-resource computing devices expand their storage with SD or MMC cards. Windows 10 thinks of these as external/temporary storage. Strictly speaking, that’s correct: You may be treating the drive as a secondary hard drive, but it can be removed and that can cause issues. Regardless, you can redirect your Documents, Music, Photos, and video libraries to this second drive.

There’s a full Answer Line article dedicated to this here, but basically, you right-click on the library you want to relocate, click on Properties, choose the Locations tab, then point the library to the secondary drive. I highly recommend that you create a folder with a suitable name such as My Libraries, and not just use the root level.

Install apps to the secondary drive

Most programs allow you to change the destination directory, which allows you to install them on a secondary drive. This generally requires that you choose the Custom or similar option when you first run the setup program. This methodology is very effective in reducing the overall footprint of your Windows installation.

Use portable apps

Even when you install programs to the secondary drive, they may still install DLLs or what-not to your C: drive, or write temporary data and settings there. Portable apps, on the other hand, run from wherever you put them and confine their configuration and temporary data to their installation location.

portable-apps-100725993-large.jpg
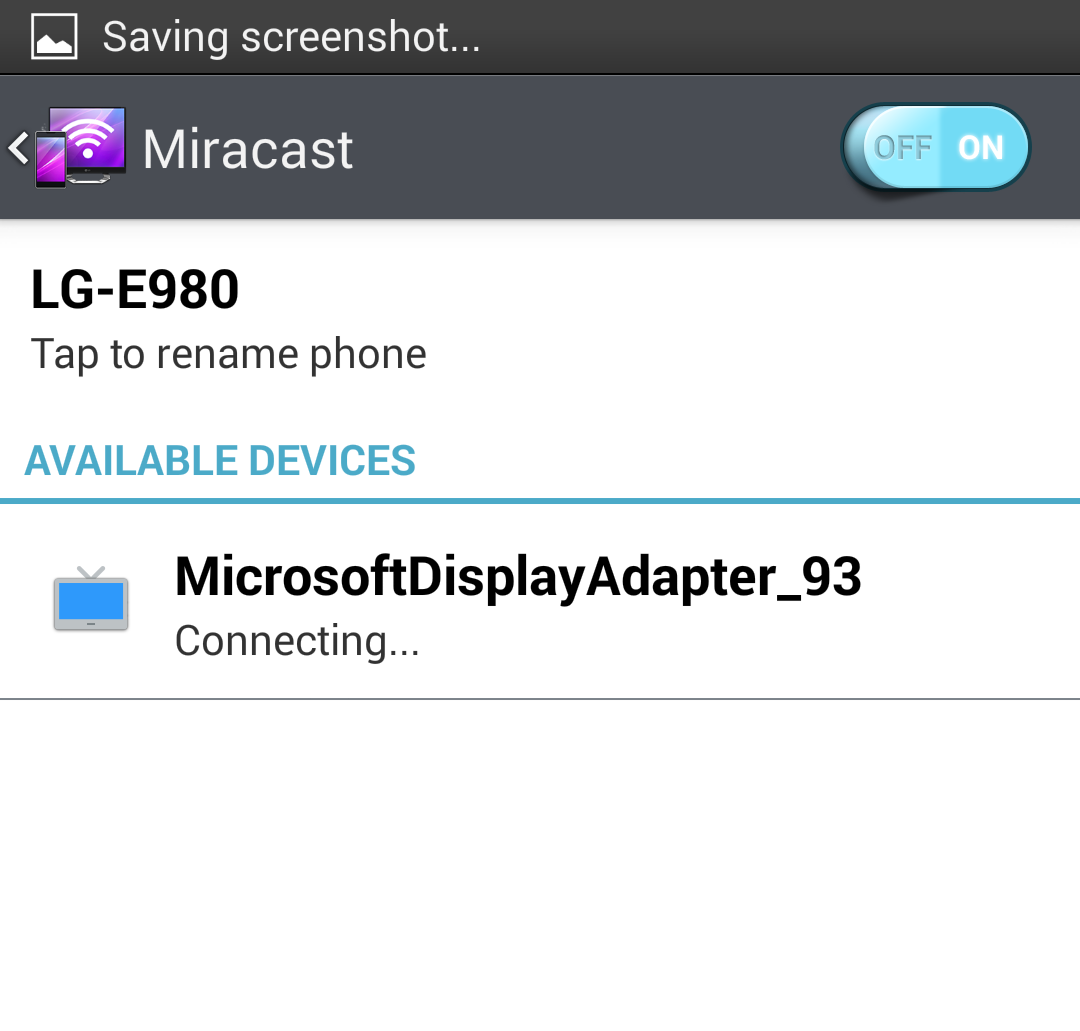
Any number of portable apps are available for free from portableapps.com

There are more of these around than you might think, and while many are free, the legality of some you might find is questionable. If you have a license for the full version. That’s all I can say about that.

6 quick ways to clear space on an overstuffed Android device

Zap cached app files in a single tap, clear the Downloads folder, delete unneeded offline maps, take charge of music downloads, and more.

6 quick ways to clear space on an overstuffed Android device

Few things in life are as annoying as finding that your Android handset refuses to install any more app updates because it’s run out of storage. Unlike many of life’s little annoyances, though, this one’s easy to fix.

You can quickly clear out hundreds of megabytes or even a gig or two by sweeping up stale downloads, rooting out offline maps and documents, clearing caches, and wiping unneeded music and video files. There’s even an easy way to find and nix space-hogging apps that you no longer use.

1. Clear out all cached app data

If you dig into the Apps storage setting screen and tap on an individual app, you’ll notice that each app has its own stash of “cached” data—anywhere from a few kilobytes to hundreds of megs, or even more.Clear out all cached app data

The “cached” data used by your combined Android apps can easily take up more than a gigabyte of storage space.


These caches of data are essentially just junk files, and they can be safely deleted to free up storage space. Tap the Clear Cache button to take out the trash.

If poking through each and every app looking for cached data to clear sounds like a chore, there’s an easy way to clear all cached app data in one fell swoop. Tap Settings > Storage > Cached data, then tap OK in the confirmation window.

2. Clean up the Downloads folder

Just like on a PC or a Mac, your Android device has a Downloads folder, and it’s a favorite hideout for miscellaneous junk files downloaded from the Web or by your various Android apps.


Clean up the Downloads folder

Tap and hold a file in the Downloads folder and then tap the Trash button to delete it.


Open the app drawer and tap Downloads to see what’s lurking in the Downloads folder. Tap the three-line menu in the top corner of the screen and sort the list of downloads by size, then take a look at what’s hogging the most storage space. If you see anything you don’t need, tap and hold the file to select it, then tap the Trash button.

3. Dump photos that are already backed up

One of the best features of Google’s new Photos app is its ability to back up your entire photo library to your online Google account. Once your snapshots are safely backed up, Photos can zap any locally stored images to free up more storage space.

android-storage-tips-delete-backed-up-photos_3-100665010-large.jpg

Google Photos will quickly delete any pictures on your device that have already been backed up to your Google account.

Open the Photos app, tap the three-line menu button in the top left corner of the screen, then tap Free up device storage. The Photos app will let you know how many pictures it can delete from local storage; tap OK to pull the trigger.

Note: If you’re using the “High quality” setting for unlimited but lower-resolution cloud storage of your backed up photos, keep in mind that the “Free up device storage” feature will delete your full-resolution originals. Make sure you’ve stored them elsewhere before you tap the OK button.

4. Manage downloaded music and podcasts

Google’s Play Music app gives you two options when it comes to storing tunes on your device: You can manually pick which purchased or uploaded Google Play songs and albums get downloaded, or you can let the app make those decisions for you. Either way, music lovers may end up with a significant amount of their device storage gobbled up by their favorite artists.

Keep an eye on downloaded music & podcasts

Downloaded tunes and podcasts in the Play Music app can gobble up an impressive amount of storage.

Same goes with podcasts, with Play Music’s default setting geared to auto-download the three most recent episodes of each subscriptions. If you subscribe to more than a few podcasts, those episodes—and the space required to store them on your handset—can add up quickly.

To check exactly how many megabytes or even gigabytes of storage Play Music has reserved for tunes and podcasts, tap the three-line menu button in the top left corner of the screen, then tap Settings > Manage downloads. To wipe a song download or a podcast from local storage, tap the orange downloaded button to the right of its name.

Bonus tip: You can use the same method to manage your downloads in the Play Movies & TV app.

5. Erase offline areas in Google Maps

Downloading a map in the latest version of the Google Maps app is a great way to navigate when your device is offline, especially now that both searching and driving directions are supported.

Erase offline areas in Google Maps

Just tap one of your offline maps in the Google Maps app to update it or—if you’re running low on storage space—delete it.


But those searchable offline “areas” come at a cost: storage space, and potentially lots of it. Indeed, a single offline map can consume more than a gigabyte of storage depending on the size of the area.

You can check how much space your offline maps have staked out by tapping the three-line menu button in the top left corner of the main Google Maps interface, then tap Offline. The storage used by each offline map is displayed below its nam. Tap the map and tap Delete to reclaim its storage space.

6. Unload your least-used apps

I love the fact that I can download and install Android apps to my devices remotely from a desktop Web browser. The downside? My Android handsets tend to be overstuffed with too many apps, many of them used only once (or even never).

clear-android-storage-space-delete-least-used-apps_7-100729970-large.jpg

You can find out which apps you use the least with help from the Play Store app.


The solution, of course, is to delete some of those apps—ideally, the ones you use the least.

To do so, open the Play Store app, tap the three-line menu button in the top right corner of the screen, tap My apps & games, then tap the Installed tab. Next, tap the Sort button near the top-right corner of the screen, then pick an option, such as Size or—better yet—Last Used. If you sort your apps according to Last Used, scroll to the very bottom of the list to see which apps you use the least. See a seldom-used app you could do without? Tap it, then tap Uninstall.

There are also several apps that can track your app usage and tell you which apps you’re using the least. Among them: App UsageApp Tracker, and QualityTime.

11 Things You Must Do In Your 20s To Avoid Regrets Later In Life

Ask anyone if they wish to go back to their 20s to avoid regrets later. Most of the answers will be a firm YES! Your 20s may seem like a perfect age. It is always when we get older, we start to look back, only to realize that we could have done things differently. How do you know if you’re taking full advantage of your 20s, making all the right decisions in your personal and professional lives? Well, you don’t. Life is about taking chances and doing your best. Being in your 20s is great. But as fun as these years are, they’re also pretty important for making sure the rest of your life goes smoothly. To all of you in your 20s, here’s a list of things you should do, or else you will regret in the later stage of your life.

1. Learn to manage and balance your time